Guide To Get Started With DS4Windows
Want to use your PS4 controller on a Windows PC but don’t know where to begin? DS4Windows is the tool that lets your computer recognize the DualShock 4 as an Xbox controller. This guide breaks it down step by step so you can get started fast.
What Makes DS4Windows Stand Out?
DS4Windows is an open-source program that turns a PlayStation DualShock 4 or DualSense controller into an Xbox 360 controller on Windows. This is important because most PC games are built to support Xbox input by default.
Unlike other tools such as InputMapper, DualsenseX, AntiMicroX, or Xpadder, DS4Windows supports more devices, offers better customization, and receives regular updates from developers.
It supports:
- DualShock 4
- DualSense (PS5)
- Nintendo Switch Pro Controller
- Joy-Cons
All of these can connect through either a wired USB cable or wireless Bluetooth.
Installation & Setup
Confused about how to install DS4Windows and get your controller working on Windows 10 or 11? You won’t find it in the Microsoft Store, but with the right files and a few simple steps, setup becomes fast and easy—even for first-time users.
System Requirements
Before installing, make sure your PC meets these key requirements:
- Windows 10, Windows 11, or Windows 8.1
- .NET 6.0 Runtime (x64)
- One or more supported controllers (e.g., DualShock 4, DualSense, Switch Pro)
- Bluetooth adapter (only if using wireless connection)
Older systems like Windows 7, Vista, or XP are not supported.
For 32-bit systems, use the x86 version of the runtime and drivers.
How to Download and Install DS4Windows
- Download DS4Windows from the official GitHub or trusted third-party sources.
- The file will be in
.zipor.7zformat. - Use 7-Zip software to extract the file into a known location like Desktop, Documents, or Downloads.
- Open the extracted folder and double-click DS4Windows.exe.
- On first launch, choose where to save settings—AppData is recommended for safe profile storage.
Install Essential Drivers
DS4Windows needs these drivers to run properly:
| Driver | Type | Purpose |
|---|---|---|
| ViGEmBus | Required | Enables DS4Windows to create Xbox 360 virtual controllers |
| HidHide | Strongly Recommended | Hides the real controller to prevent double input issues |
| FakerInput | Optional | Adds extra support for mapping controller to mouse and keyboard functions |
Final Checks
After installation:
- Plug in your controller (via USB or Bluetooth).
- DS4Windows will detect and assign profiles automatically.
- Create or edit profiles for specific games as needed.
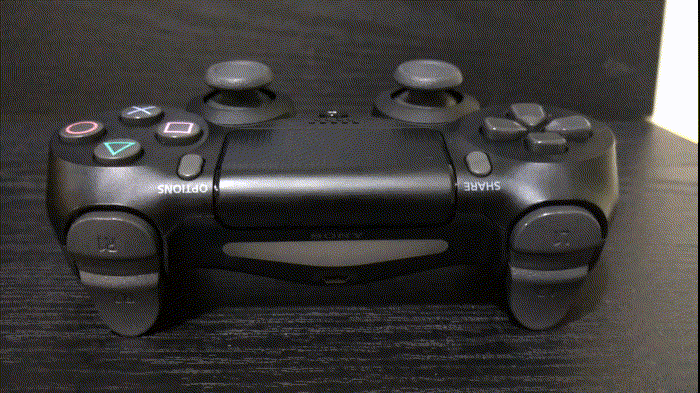
Connect The Controller To Your PC & DS4Windows Tool
Trying to link your controller to your PC but keep running into connection issues or double inputs? Whether you’re using USB, Bluetooth, or a wireless adapter, here’s exactly how to set up your controller with DS4Windows the right way—fast, simple, and error-free.
1. USB Connection (Recommended)
The most stable and lag-free method is using a USB cable. It gives you full access to features like rumble, haptic feedback, and adaptive triggers, depending on your controller and DS4Windows version.
Steps:
- Use a data-capable USB cable (not just a charging-only one).
- Plug one end into the controller (DS4, DualSense, or other).
- Connect the other end to your PC or laptop.
- You should see a message like “Device has been detected.”
If nothing shows up, switch to a different cable that supports data transfer. Some cheap cables only charge.
2. Bluetooth Connection
Wireless connection is clean and cable-free but can have slight delay. To avoid lag, use a Bluetooth 4.0 or higher USB adapter.
Bluetooth Setup:
- Enable Bluetooth on your PC.
- Put the controller into Pairing Mode:
- DualShock 4: Hold PS + Share until the light blinks.
- DualSense: Hold PS + Create until it blinks.
- On your PC, search for available Bluetooth devices.
- Select your controller. If asked for a PIN, enter 0000.
Hold down the PS and Share buttons on your DualShock 4 (DS4) at the same time until the light bar begins flashing.
Press and hold the PS and Create buttons on your DualSense (DS5) controller until the light bar starts blinking.

Press and hold the PS button on your DualShock 3 (DS3) controller for 1 to 3 seconds until the red light starts flashing.

Press and hold the Sync button until the controller LEDs begin blinking back and forth, indicating it’s in pairing mode.
If you’re using a replica of the original DualShock or DualSense controller, follow the same pairing steps as the original model to connect it to your Windows PC.
If the controller fails to connect, remove it from known devices and pair it again.
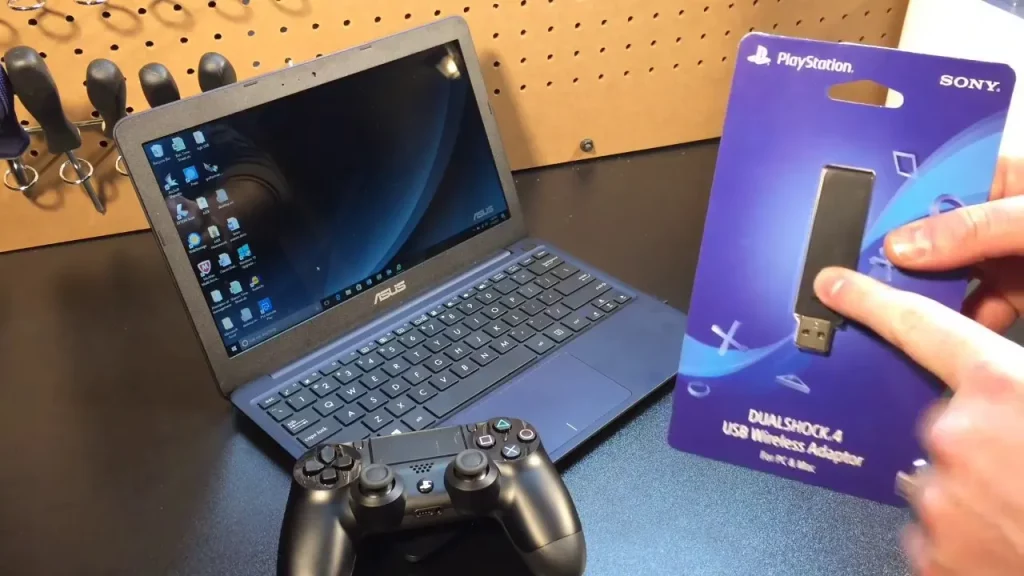
3. DS4 USB Wireless Adapter
This method supports audio and mic through the controller’s jack—ideal for chat-heavy games.
Steps:
- Insert the DualShock 4 USB Wireless Adapter into your PC.
- Hold the adapter’s button for 1–3 seconds until it blinks (pairing mode).
- Put your controller in pairing mode.
- When both devices blink, they are pairing. Wait for a stable light to confirm.
Once connected, DS4Windows will detect the controller and apply your saved profile automatically.
Important Steps To Use DS4Windows Correctly W/O Any Issues
Is your DualShock controller acting up or not working with games on PC? Before jumping to conclusions, it’s important to set up DS4Windows correctly. If the tool isn’t configured the right way, you may face double input errors, no rumble, or even total disconnection.
1. Start With Driver Installation
To use DS4Windows properly, first install the ViGEmBus Driver. This driver allows your DualShock 4 (DS4) or DualSense to appear as an Xbox 360 controller, which most PC games support.
Also, install HidHide, which helps block your system from reading your real controller and prevents double input issues.
- Visit the official DS4Windows GitHub page.
- Download and install the latest version.
- Open DS4Windows and install ViGEmBus and HidHide when prompted.
2. Connect Your Controller to the PC
You can connect using USB cable, Bluetooth, or DS4 USB Wireless Adapter.
- For USB, use a data-capable cable.
- For Bluetooth, make sure the controller is in pairing mode and your PC has Bluetooth enabled.
- If you use a wireless adapter, press its pairing button and then pair your controller.
Once connected, DS4Windows should detect your controller automatically.
3. Start DS4Windows & Check the Status
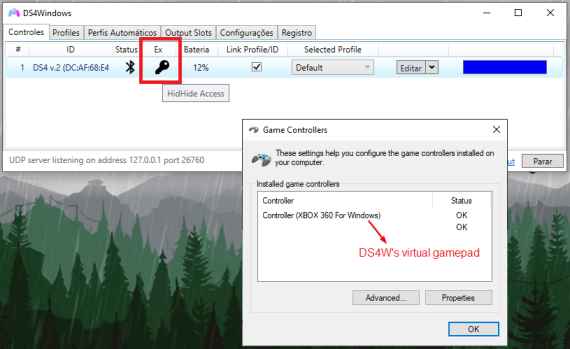
If DS4Windows shows “Stopped,” press the Start button in the top bar. This turns on the virtual controller emulation.
In the Controller tab, check for the Key icon. This means the physical controller is hidden and only the virtual Xbox controller is active.
- If you see an X mark instead of a key, HidHide isn’t hiding the real controller.
- Open HidHide, tick your real controller, and ensure DS4Windows is trusted.
4. Use the Right Profile Settings
The Default profile enables Xbox 360 emulation. This makes your games believe you’re using an Xbox controller.
By default:
- The touchpad acts like a mouse.
- You can press and hold the PS button and tap the touchpad to toggle mouse control.
To emulate a DS4 controller:
- Create a new profile.
- In the Profile Editor > Other tab, change “Virtual Controller” to DualShock 4.
Note: Rumble won’t work in DS4 emulation, but it does work with Xbox mode.
5. Create Custom Profiles (Optional)
You can create multiple profiles for different games. Assign different sticks, triggers, and sensitivity levels as needed.
- Go to the Profiles tab
- Click New
- Choose a preset (Xbox 360 or DS4)
- Adjust the settings and save
This lets you switch profiles depending on the game’s support and your personal preferences.
Bluetooth Pairing Chart for DS4/DualSense Controllers
| Controller Model | Enter Pairing Mode | PC Detection Name | Notes |
|---|---|---|---|
| DualShock 4 (DS4) | Hold PS + Share until lightbar blinks | Wireless Controller | Works best with DS4Windows |
| DualSense (DS5) | Hold PS + Create (Share) until lightbar blinks | Wireless Controller | Rumble may not work on all games |
| DualShock 3 (DS3) | Hold PS for 1–3 secs until red LED blinks | May require SCPToolkit | Not fully supported by DS4Windows |
| Generic DS4 Replica | Same as DS4 | May vary | May not support rumble or full features |
Profile Setup Example for Xbox Emulation in DS4Windows
Goal: Use DS4 controller in Xbox 360 emulation mode with touchpad mouse enabled.
- Open DS4Windows → Go to Profiles tab.
- Click “New” → Choose “Xbox 360” as virtual controller.
- Name the profile (e.g., “Default Xbox Mode”).
- In Controls tab:
- Keep all default button mappings.
- In Touchpad tab:
- Set Touchpad as Mouse: ✅ Enabled
- In Other tab:
- Virtual Controller: Xbox 360 Controller
- Use Dpad for mouse: ❌ Disabled
- Save the profile.
- Go to Controllers tab, assign the new profile to your controller.
Now your controller will act like a full Xbox controller, including proper game support.
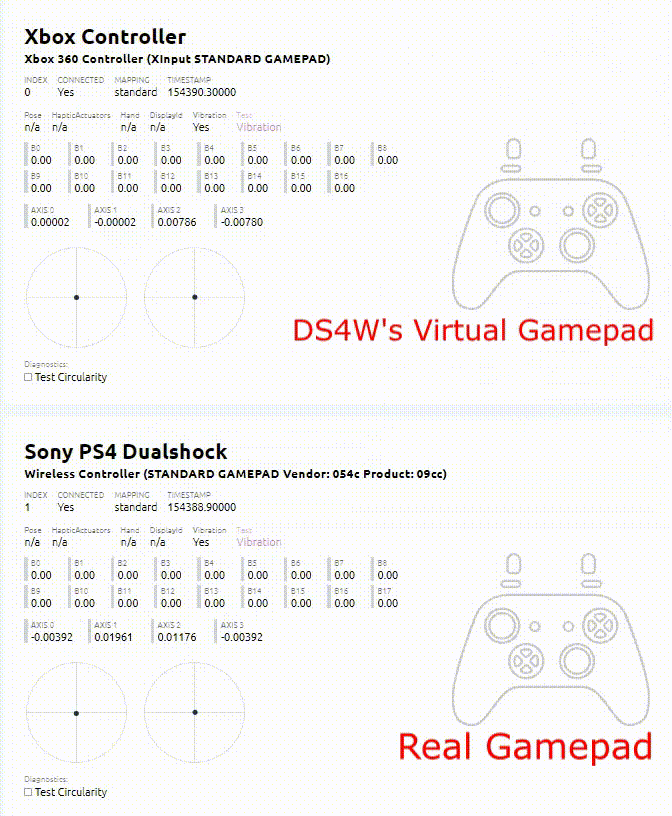
How To Prevent Double Controller / Double Input Issue In Games?
Ever pressed a button in-game and watched chaos unfold—wrong moves, auto multiplayer, or commands doubling up? This is often caused by the double input issue, where your PC sees both your real controller and a virtual one at the same time. Here’s how to stop it.
What Is the Double Controller Input Problem?
The double input issue happens when a game receives signals from two controllers—your physical controller (like a DualShock 4) and a virtual controller created by tools such as DS4Windows. Instead of working together, they conflict.
Games like those running on Windows 10 or 11 may treat both as separate players. This causes:
- Commands registering twice
- Unwanted multiplayer activation
- Ignored inputs from the virtual controller
- Incorrect actions due to signal confusion
This problem often appears when the real controller isn’t hidden from the system, especially when using DS4Windows without the proper configuration.
- The game registers the same button press twice, causing repeated actions and making gameplay frustrating.
- It may automatically switch to two-player or multiplayer mode, even if you’re playing solo.
- The virtual controller’s input is often ignored because the game recognizes the real controller first.
- The game gets confused by mixed signals, leading to incorrect or random in-game actions.
- In many cases, the game fails to read inputs from the virtual controller at all, since it prioritizes the real one from the start.
As shown in the image below, the game receives input from both the real and virtual controllers at the same time. However, these inputs may not always match, which can cause unpredictable behavior during gameplay.
Best Solution: Use HidHide Driver
The most reliable way to prevent double inputs is by installing the HidHide driver. This Windows tool hides real controllers from the operating system, allowing only the virtual controller to be detected by games.
How to Set Up HidHide
- Install HidHide from the official GitHub or developer source.
- Restart your PC after installation for changes to take effect.
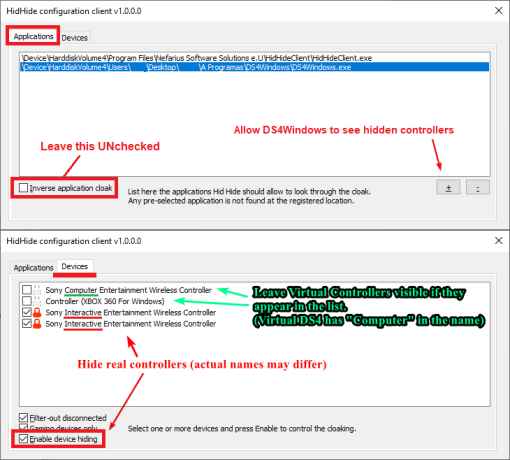
- Open the HidHide Configuration Client.
- Hide your physical controllers (USB or Bluetooth) by checking them in the list.
- Allow DS4Windows to access hidden devices. This lets it emulate an Xbox 360 controller correctly.
Once set up, your games will only see the virtual controller, eliminating any double input issues.
Tips to Use HidHide Effectively
During Setup:
- Close DS4Windows before changing HidHide settings.
- Only hide real controllers (e.g., do not hide entries labeled “Sony Computer…”—these are virtual ones).
- After setup, close HidHide before reopening DS4Windows to avoid detection errors.
After Setup:
- If things don’t work, uninstall and reinstall HidHide, then restart your system.
- Disable “Hide DS4 Controllers” in DS4Windows if HidHide is active. That legacy setting is now redundant and can cause more problems.
Why “Hide DS4 Controllers” Option Is Outdated
The “Hide DS4 Controllers” checkbox in DS4Windows was the older method for blocking real controllers. It works by asking Windows to give exclusive access to DS4Windows. However, it fails if:
- A browser like Chrome or Edge is open.
- Another app is using the gamepad.
- You’re using NVIDIA drivers with known bugs.
HidHide avoids these limitations by controlling visibility at the driver level, making it more stable and reliable.
Everything You Need To Know About Axis Config
Why do your joystick movements feel off or unresponsive in games or simulators? The problem often lies in how your axis configuration is set up—especially in how it handles dead zones and sensitivity.
Axis Config refers to how input devices like joysticks, gamepads, or simulation gear interpret movement along a particular axis (X, Y, Z, etc.). It directly affects how physical movement translates into digital action.
Dead Zone Selection | Anti Dead Zone Selection


Dead Zones and Anti-Dead Zones Explained
A dead zone is a small range near the center of an axis where input is ignored. This prevents unintended movement from hardware jitter or wear. For example, when the stick is slightly tilted but you don’t want it to register as movement, the dead zone filters it out. It’s often marked as a red area in testing tools.
- Input inside the dead zone → Output remains zero or neutral
- Input outside the dead zone → Output starts increasing
An anti-dead zone, on the other hand, helps avoid sluggish responses just outside the dead zone. It applies a minimum output once movement exceeds the dead zone, making response feel snappier.
Manage Backups, Restoring, Delete User Data & Settings
Need to reset your settings, restore backups, or remove unwanted user data in DS4Windows? Losing profiles or configs can mess up your entire game setup. Here’s a fast, fact-based guide to help you back up, restore, and delete user data the right way.
Key User Data Files in DS4Windows
User data includes configuration files that control how DS4Windows works. The most important files are:
- Profiles folder – stores custom controller profiles
- Profiles.xml – main list of user profiles
- OutputSlots.xml – output slot settings
- Auto Profiles.xml – automatic profile assignment
- LinkedProfiles.xml – links between profiles
- ControllerConfigs.xml – controller layout settings
- Actions.xml – saved actions and macros
How to Back Up DS4Windows User Data
- Open DS4Windows and click the Settings tab.
- Click Profile Folder to open the directory.
- Check if the files listed above are there.
- If they’re missing, go to the main DS4Windows folder manually.
- Choose the folder that contains Profiles.xml for full backup.
- Copy the entire folder and store it in a safe location (e.g., external drive).
Tip: If both folders have data, use the one with Profiles.xml as the main source.
How to Restore User Data in DS4Windows
- Go to the folder with Profiles.xml.temp.
- Delete any existing Profiles.xml in that folder.
- Paste your backup files into the same directory.
- If restoring to the main DS4Windows folder, the tool will auto-select the correct one.
DS4Windows gives priority to the valid folder. It may delete the unused data later.
How to Delete DS4Windows User Data
- Open the folder with saved configs.
- Select unwanted files (e.g., Profiles.xml, ControllerConfigs.xml).
- Press Delete or Shift + Delete for permanent removal.
Warning: Deleted files cannot be recovered unless previously backed up.
Always back up before making changes. This ensures that your settings, profiles, and configurations remain safe and recoverable.
How To Uninstall DS4Windows & Drivers?
Wondering why your controller setup is acting up or cluttered? Learn how to completely remove DS4Windows and its hidden drivers to fix issues or start fresh—step-by-step, clean, and fast.
1. Delete the DS4Windows Folder
DS4Windows is a portable tool, not a standard installed program. That means it doesn’t appear in the “Uninstall Programs” list.
- Find the folder where you extracted DS4Windows (usually in Downloads or Desktop).
- Right-click the folder and choose Delete.
- That’s it—DS4Windows is removed.
Tip: If you need it again, re-extract the ZIP file and open the
.exefile.
2. Remove DS4Windows Settings and User Data
- Press
Windows Key + R. - Type
%appdata%and press Enter. - Open the Roaming folder.
- Find the DS4Windows folder and delete it.
3. Uninstall ViGEmBus Driver
This driver supports virtual gamepad input. If you don’t use it for other tools:
- Open Control Panel → click Uninstall a program under “Programs”.
- Look for ViGEmBus in the list.
- Double-click it and follow the uninstall instructions.
4. Remove HidHide Driver
- Open Settings → go to Apps → Apps & Features.
- Type HidHide in the search box.
- Click Uninstall, then follow the prompts.
- Restart your PC to apply changes.
5. Remove FakerInput Driver
- Same path: Settings > Apps > Apps & Features.
- Search for FakerInput.
- Click Uninstall, confirm, and restart your system.
6. Uninstall Legacy Drivers (HidGuardian, ScpVBus)
These are older support drivers for DS4Windows. You can safely remove them now:
- Open Control Panel → Uninstall a program.
- Select HidGuardian and click Uninstall.
- Do the same for ScpVBus.
- Restart your system to finalize driver removal.
How To Prevent Conflicts Between Steam and DS4Windows?
Frustrated with your DS4 controller not working properly through Steam? This often happens when Steam Input and DS4Windows both try to remap your controller at once. The result? Games misread your inputs—or don’t respond at all. Let’s fix that with clear, conflict-free steps.
Why Conflicts Happen
Steam includes a built-in controller remapping system. DS4Windows (DS4W) also emulates Xbox input from your DualShock 4. When both tools try to take control, it leads to duplicate or mismatched inputs. To prevent this, only one system should handle remapping.
Step-by-Step Fix: Disable Steam Input
- Open Steam on your PC.
- Click Settings > Controller > General Controller Settings.
- Uncheck all configuration support boxes—especially PlayStation Configuration Support.
- Close settings and restart your PC.
This tells Steam to ignore your controller, letting DS4Windows handle input fully without interference.
Extra Tip: Big Picture Mode Fix
Want to use Steam’s Big Picture Mode?
Rename the DS4Windows .exe file to something custom (like ds4custom.exe). This tricks Steam into ignoring DS4W, avoiding automatic remapping.
⚠️ Note: Using both remappers together is not recommended. It may still cause minor issues.
How To Run DS4Windows Under A Custom “.exe” Name?
Tired of games or apps ignoring your DS4 controller even though it’s connected? Some software detects DS4Windows.exe and blocks controller input. This issue affects popular platforms like Steam, Yuzu, and others. But renaming the file can fix it fast—here’s how.
Why Rename DS4Windows?
Some games and emulators scan for known programs like DS4Windows. When they detect it, they stop responding to controller inputs. Common examples include:
- Shovel Knight – ignores DS4 controllers
- Yuzu/Cemu Emulators – block PlayStation inputs
- Steam Big Picture Mode – doesn’t respond to DS4
- Steam Input – ignores all DS4 signals, even with config support enabled
Running DS4Windows under a custom .exe name tricks these apps into accepting your controller.
Steps To Run DS4Windows Under A Custom “.exe” Name
- Open DS4Windows
Make sure the app is running on your computer. - Go to Settings
In the settings tab, look for the “Run at Startup” option. - Turn Off Startup Option
Disable “Run at Startup” if it’s already turned on. - Set Your Custom Name
On the right-hand side, find the field “Custom Exe Name.”
Type a name likeDS4Win(or anything else without.exe). - Restart DS4Windows
- Click “Stop” at the bottom right
- Then click “Start” again
- Close and reopen DS4Windows to apply the change
The program will now run under the new name, bypassing detection issues.
How To Revert Back to the Original Name
Turn On “Run At Startup” Again
Re-enable the setting if needed.
Close DS4Windows Completely
Make sure it’s not running in the background.
Reopen Original DS4Windows.exe
Use the original file you downloaded.
Disable “Run At Startup”
Turn it off temporarily.
Clear the Custom Name
Remove any text from the “Custom Exe Name” field.
Restart the App
Press “Stop”, then “Start”.
Final Note
DS4Windows lets you use PlayStation controllers on Windows by emulating Xbox controllers for broad game compatibility. Always download it from the official site (ds4-win.com) and install the recommended drivers like ViGEmBus to avoid issues such as double input or lag.
For detailed controller input info, Microsoft’s XInput documentation is a reliable resource. Remember to back up your profiles before uninstalling or switching devices.If problems arise, check official support forums like the DS4Windows GitHub discussions or Steam’s input support. Following these steps will help your controller work smoothly on PC games without extra hardware.